Your Cart is Empty

So you've taken the plunge and ordered a new clip in hair extensions. It's an exciting time and I'm sure you are ready to get started rocking your new locks. This is going to be a how to install them to achieve the most natural look possible. In some areas, I'll include a few tips and tricks if you find certain parts more difficult. There is obviously more than one way to install clip in hair extensions, this method is one I've found to be the most natural and most secure of methods. If you have been used to installing clip in extensions before and are looking for an alternative method this could be for you as well.
What You'll Need For the Install:

Preparation- Firstly, you will need to start with clean dry hair. So shampoo and conditioner your hair as normal. Then blow dry with a great protectant. After your hair is completely dry you'll need to detangle your natural hair. Before installing your cup in hair extensions also make sure they are detangled. After this is don't you are ready to move on to the next step.

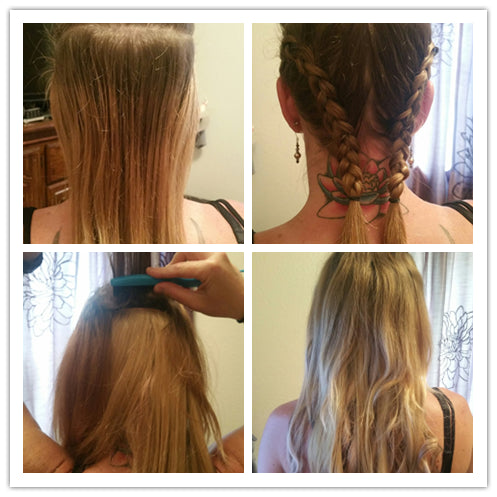
Sectioning your hair-you'll want to start by taking a section if your hair you intend to leave for the leave out and put it in a clip or ponytail. It will resemble a horseshoe around your head. For now, leave down that section of hair. At this point, you are left with two options. Either you can cornrow your hair downwards towards the nape of your neck or you can put your hair in a very low ponytail securing at the base with a hair rubber band. I prefer to braid or cornrow simply because the extensions have more to grab to and feel more secure.

Braiding vs low pony- Either one will work for an install, for most people you will find that a low pony will do the trick. If you choose to braid, start from by your ear and work towards the and braid downward once you have reached the middle. Once you have finished these rows you will secure at the base with a small hair rubber band. If you choose the low pony brush neatly and secure with a rubber band. Next, you will want to pin up the remaining hair upwards towards the crown of your head.
Installing the clip in extensions- start at the very bottom with a 3 clip weft. As you move up the transition to the 5 clip wefts. Once you reach by the ears if you have a 3 clip you will place these at a diagonal angle downwards towards your neck. This isn’t a drastic angle just a natural one. Then use a two clip weft above each ear. Lastly, you will apply a 4 or 5 clip weft at the very top near the part line of hair you have left out/ After these are in place you can then let your remaining hair out of the ponytail holder.

Blending- By far the hardest part will be blending your natural hair in with the extensions. Heat up your flat iron. Start with small section first, starting one at a time with about a ¼ inch of hair. Smooth with a flat iron. After your natural hair is smooth you will flat iron some of the extensions with your natural hair. Always remember to use a heat protectant. Move up towards the top of your head until all your natural hair is smooth. Tip: Curling your hair under at the ends will help to blend your extension hair with your natural hair. Tips for the back: If you tease the layer right under the crown in the back it can hide the extensions more so than leaving it flat. To do this you would just use a teasing comb. It is recommended to tease right about the area where your last clip ins are located.
If you find you need additional hair in the bang area, you can add the single clip extensions to fill in. Once all the extensions are in you can smooth once again with a flat iron, and finish with a finishing spray or hairspray if you’d like.

As you can see, installing your very own clip in hair extensions is quite easy. The trick is not to rush your install. If need be you can play around with angles to see what flows more naturally for your head. Remember going diagonally on the sides will flow more like your natural hair. Always use a heat protectant on your extensions to keep them looking their best. Also, there is a thing as too much hair, so if it looks like you are super full on top and not enough at the bottom to balance, you may need to take one weft out.
 2023 Trending Hairstyles On Tik Tok And Instagram For Black Women
  The Best Shampoo And Conditioner For Hair Extensions
  The Psychology of Hair Extensions
  How Hair Extensions Can Be A Game-Changer for Special Events
  Beyond Length: Creative Uses of Hair Extensions for Volume and Texture
  How To Get Your Extensions to Seamlessly Blend With Your Natural Hair
  The Science of Hair Extensions: Understanding the Hair Extension Process
  5 Great Ways To Keep Your Natural Hair Moisturized
  9 Hairstyles For Every Holiday Mood
  10 Wedding Hair Tips And Tricks Every Girl Must Know

