Your Cart is Empty

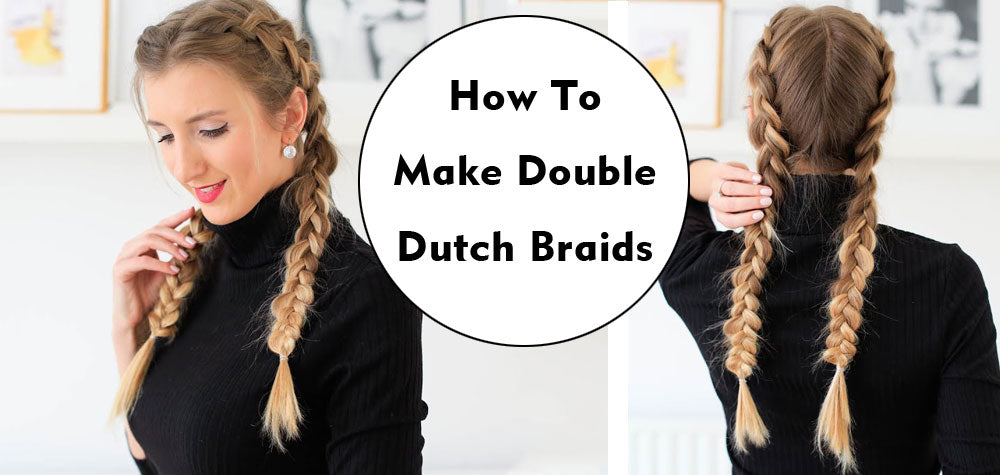
What do you get when you invert a French? A Dutch, of course. Dutch braids or inverted French braids are one of the most beautiful and important braids to rock. They have been around forever and will still be, as they have made a fashion statement that will never be silenced.
Rocked by A-list celebrities and superstars from the Kardashians to the bardest woman on the planet Ronda "Rowdy" Rousey, the double Dutch braid has been making a lot of positive impacts and has been popularly called the "boxer braids" because of the way it perfectly sits on your hair without getting any hair on your face and yet looks quite edgy and timeless.
The double Dutch braid is a unique style as it leaves the braid sitting on top of your head rather than it looks like it is woven into it. The double Dutch braid is known for its versatility that it makes you look elegant wherever you are - red carpet, dinner night, office or even a brunch date.
The best part of the double Dutch braid and the reason it beats its cousin, the Dutch braid, is due to the fact that although the Dutch braid works on most lengths of hair, the double Dutch braid works on all including the very short hair.
It looks quite complex for a beginner, but it's actually quite easy to braid, and with our easy tips, it just got easier.

The first step in braiding all hairstyles is to make sure that your hair is brushed neatly, it doesn't matter if your hair is damp or dry as double dutch can be braided on either, what matters is that your hair is brushed neat to free it from knots and tangles. If your hair is making any attempt to fly away, you can smoothen it with pomade or serum. Wet hair for braids makes your hair curl without using heat rollers.

For the next step, you need to get a symmetrical look, so you need to brush the hair and give it a central part to easily divide the hair into two sections on your hair. Divide your hair from the forehead to the nape, brushing the left section to the left shoulder and the right section to the right shoulder. After dividing them into sections secure one of them with a clip or elastic to keep it out of the way while you do the other.
We'll be making use of the left section as we've secured the right section out of the way. Gather 2-inch width of hair from the left section directly at the hairline. If you're working with the right section, you gather 2-inch width of hair from the right section directly at the hairline.

After gathering the hair, split it into three equal strands, hold the left strand firmly in your left hand and the remaining two in your right hand, the middle strand should be between your index and middle finger, with the last strand between your pinkie finger and your palm.

Begin by crossing the left strand under the middle strand, then follow it by crossing the right strand under the newly made middle strand. After every crossing, make sure to Tig it gently to tighten the braids from loosing. Your double Dutch braid will not work if you braid the strands over the middle strands, so be careful to braid it under. If you're working with the left section, start with the right strand over the middle strand and continue working that way.
For every cross, you make from the left strand, add some extra thin hair from the left side of your hairline, make sure the added hair is thinner in size to the ones it is being added to, then cross it under the middle strand. Repeat this process with the right strand, add extra hair but this time it should be from the part to your right strand and cross it under the middle strand.
Continue to braid it till you reach the nape, keeping it even between your hairline and the center part. Let them be of equal size and tension. When you reach the end of the nape, finish it off with a regular braid.

Exactly the same process should be applied to the other section that was secured in the beginning. Finish the process by wrapping the two sections into a bun, crown or relaxed ponytail.
There you have it, double dutch braid neat and beautiful. See, we told you it was easy!
 2023 Trending Hairstyles On Tik Tok And Instagram For Black Women
  The Best Shampoo And Conditioner For Hair Extensions
  The Psychology of Hair Extensions
  How Hair Extensions Can Be A Game-Changer for Special Events
  Beyond Length: Creative Uses of Hair Extensions for Volume and Texture
  How To Get Your Extensions to Seamlessly Blend With Your Natural Hair
  The Science of Hair Extensions: Understanding the Hair Extension Process
  5 Great Ways To Keep Your Natural Hair Moisturized
  9 Hairstyles For Every Holiday Mood
  10 Wedding Hair Tips And Tricks Every Girl Must Know

